


Hey Fellas... So I did an amazing write-up the last time, the article was on the famous SOLID principle, and I got some amazing feedback. To be honest, I am glad that I did it, and I think I would be doing more. Y'all better get ready. lol
Well, if you have not read it or you feel you need to learn more about it, you can read about it here
Checking In: How are you doing, people.

There have been many strong waves recently regarding blockchain, web3, solidity e.t.c. I got carried by the wave too, and believe me, this is one field I am definitely exploring, at least for the next five years. Lol.
Made my research and the rest, and boom, I started learning Solidity. It has been a beautiful journey till... time to implement the frontend, and all articles I have been reading have all been on React.js.

I am like, hello, give me something other than React, let me run this thing, Vanilla JS too, pleaseeeeeeee but articles or videos I have been seeing were either too old or never comprehending. So I decided to try things out myself, and guess what? I succeeded.
So I broke the entire readings into two articles. Why two? Well, I could use 1 to explain the entire process, write out the code and all, but then, for me, writing or teaching is not all about getting you to the answer but about helping you understand how the answer comes about. This doesn't mean this article would be less informative; in fact, for both articles, we would be creating a simple, smart contract and integrating it with a front end, Although the second would be more fun as we would be building a wallet system. But then, this one comes in handy as it ushers you into the future (hehe). So this would be like a bedrock for what we would be doing. So that beyond just building wallets systems or writing smart contracts, you actually understand what is going on under the hood. And the good thing is that we won't be using any framework or library; we would be using pure vanilla JS. Trust me, this article would be as informative and easy to understand as my other articles have been.
Wait... You have not read any of my articles?

Well, you are missing a lot. So go ahead and start reading.
So let's get this shit done.
This article would aid understanding of the basics and bare-bones of the decentralized application (DApp). To follow along on this article, it is cool if you understand JavaScript, Node, HTML.
Quickly, what is blockchain?
The general idea of blockchain is to provide a publicly available, decentralized database. Here, everyone can participate and work with the network without fear of one-person control or someone manipulating certain data to their advantage. Everyone in the network has a copy of all the information available through the network.
At a high level, a blockchain is essentially a record of transactions—in other words, a ledger.
What makes a blockchain's ledger unique is that it's distributed throughout the peer-to-peer network it resides. There is no single source of truth; instead, those transaction records are duplicated across individual nodes on the network.
What is Ethereum?
According to google, Ethereum is a decentralized blockchain platform that establishes a peer-to-peer network that securely executes and verifies application code, called smart contracts.
Ethereum is simply a set of nodes, and by a set of nodes, I mean the network that makes up the blockchain. They are just a set of computers connected on a P to P level on a fundamental level.
These computers contain data, and the way they talk to each other is called a transaction. Each of these transactions is stored in every computer on the network. Hence, no centralized server is created to hold this data, but these nodes store the data.
When we talk about transactions, essentially, it means sending a data structure (object) to the network. There are two types of transactions; one results in a message call, e.g., Querying to know the balance of an Ethereum account, transferring from an account to the other. The other results in the creation of a new account.
Enough talk, let's build.

What would we be using:
- Solidity
- A simulated blockchain on our PC
- Node
- HTML, Javascript
Let's write our first smart contract. Open your VScode or any other IDE and create a project folder. Go and initialize the project by typing 'npm init -y' in the command terminal. This should initialize your project and also create a package.json file.
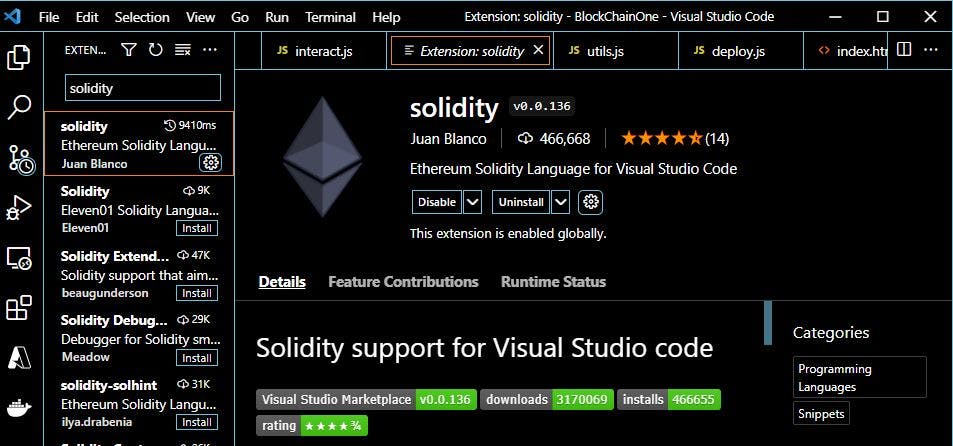
We must add the solidity extension to our project. So in case, you don't have the extension, go to the extension section in your visual studio code and search for 'solidity' and install it.
Solidity is the language that we would use to create our smart contract. Smart contracts are similar to functions in Javascript. While functions define certain attributes, logic, and operation in the web and every other platform that Javascript implements, smart contracts do the same thing for blockchain.
In the folder, create a simple file called SimpleProgram.sol. '.sol' is an extension for solidity programming language. In the file type:
pragma solidity ^0.8.0;

contract SimpleProgram {
    uint x;

   function get() public view returns(uint) {
        return x;
    }

    function set(uint y) public {
        x = y;
    }
}
Wait... What're all these???
Well, let's take it to the line by line. The first line is like a default to every solidity smart contract program. Basically, it gives the compiler of our smart contract, telling it that this particular smart contract that we are writing needs to be compiled with the stated version of solidity (^0.8.0). But why is this version stated this way? The '^' in front of the version number basically states the range of which version should run it. Assuming we explicitly write out our version, e.g., 0.8.5, and the compiler is running on 0.8.9, it would run, although there would be a bit of conflict while running the smart contract. So the '^' tells the compiler that any version from 0.8.0 upward is fine to run the contract. So if we had said ^0.7.0, it simply means that any version from 0.7.0 is ok to run our smart contracts. So even though the version of solidity we have installed is not the same as the compiler, our smart contract would run without any hitch.
In the next line, we defined our smart contract using the term 'contract.' It is useful to note that while defining your smart contract, the name you use to define the smart contract should be the same as the name of the solidity file. In our case, the name of our file is SimpleProgram.sol, and the name of our smart contract is SimpleProgram.
You Gerrit... If you don't gerrit, forget about it.... lol
We then define our first variable. In solidity, variables are defined by calling the data type you want the variable in and then the variable name. In our case, 'uint' is the data type which basically means unsigned integer. You can read more about data types in Solidity here.
In solidity, like in JavaScript and many other programming languages, we can decide to define our function and assign a value to the function later. In this case, we defined a variable and we would assign a value to this variable in the latter part of this article.
The next thing we did was to create a function 'get,' which returns the value of the variable x that we defined. But there are other terms in this our function what are they? Public: While defining a function, it is expedient to define the accessibility level for our function. In solidity, there are three accessibility levels; we have public, internal and external. Through this, Ethereum virtual machine (EVM) can know who can access the logic inside the function. Since we set it to the public, the function is available to everyone and anyone who interacts with our smart contract.
View: View is the same as read-only. We are telling the EVM that our function is read-only, which means there is no change happening in this function.
Returns(uint): Since we said that our function is read-only, the EVM is conscious of knowing what type of data we are reading to the user. This is where returns(uint) come in, which means returning an integer to the user.
And finally, in the function, we return x.
We defined another function. This time without the view and returns keyword. When the view keyword is absent, the EVM assumes that the function is not a read-only function, which is correct because our function 'set' is not a read-only function as we are setting the value of x to another integer y.
We cannot directly send it to the blockchain; we need first to compile it and convert it to bytecode because this is what the EVM understands. To achieve this, we would be using a global dependency called Solc. Solc is a solidity compiler that would provide you with the necessary artifacts for your contract. To install Solc into your project type 'npm install -g solc' in your console.
After installation, to test your Solc, open your command window and type in 'solcjs' You should see a similar output like the one shown below:
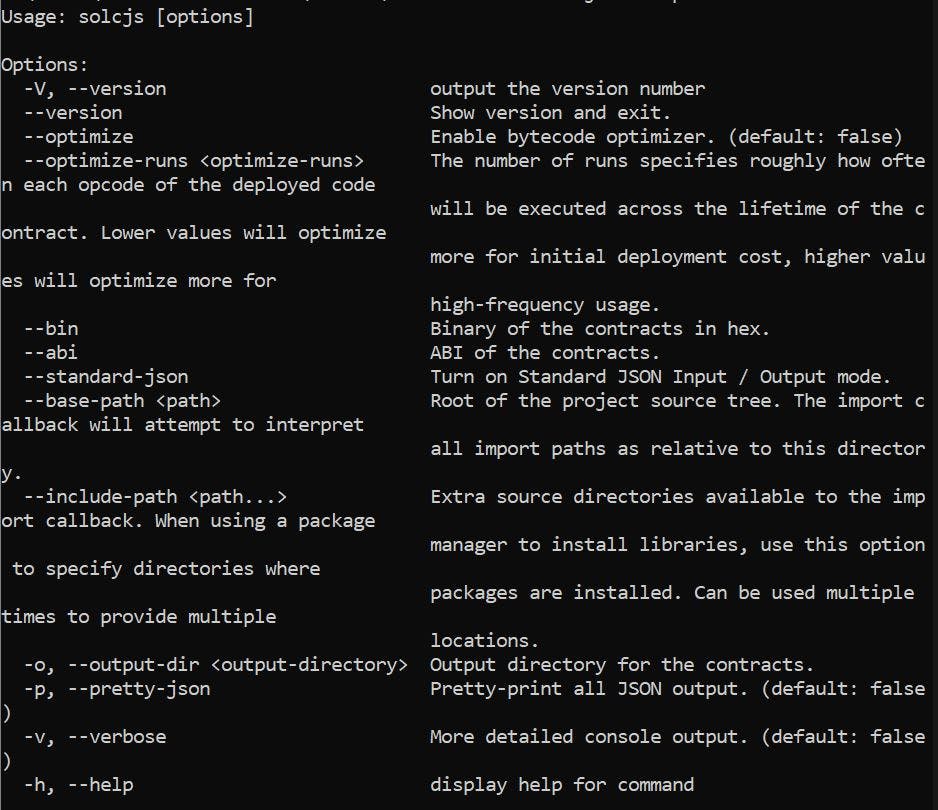
As you can see, we can do many things with the Solc package like getting the version number of our solidity, optimizing our byte code, e.t.c. You can play around with them. Remember our goal, for now, is to compile our contract, and we stated that we need our bytecode to be able to compile our contract. We want to get our bytecode, and to do that; we would be using the '--bin' helper keyword. So in your command prompt, type:
'solcjs SimpleProgram.sol --bin'
Which is basically solcjs, then the name of your solidity file, then --bin.
If it runs successfully, it should create a new file in your folder in which its content is a hex number. What these hex numbers do, is help the EVM detect your new smart contract and thereafter return you the address.
Create a new Javascript file in your project and name it whatever you want. In the file you just created, we will be saving our bytecode here just so that we can use it in other files. So in this your new file, type:
    module.exports = {
    bytecode: `0xHex_Numbers_Generated`
}
Where 'Hex_Numbers_Generated is the hex that Solc generated for you. Now you see that we added '0x' to the prefix of our string; this is to help the EVM understand what kind of string follows next and also let it know that it is the initialization of a smart contract.
Now we have our contract and our bytecode ready. But then, to be able to interact with our smart contract, we would need another artifact which is called ABI. ABI means Application Binary Interface. The ABI basically converts our smart contract to an array-object-like code, easing interaction with the web (frontend). Here, every frontend can know through the ABI what parameters are going into the blockchain and what parameters are to be returned. To get the ABI artifact for our smart contract, again in the same command prompt (or another), run:
'solcjs SimpleProgram.sol --abi'
You'd notice another file created for us in our project folder.
Place the ABI under the bytecode,
    module.exports = {
    bytecode: `0xHex_Numbers_Generated`,
    abi: `abi_code`
}
Let's deploy our smart contract. Create a new javascript file in our project and name it deploy.js (or any name). But first, for us to deploy our contract, there has to be a blockchain. Remember, at the beginning of this article, we mentioned a simulated blockchain on our PC as part of the requirement. This is where we would need it. In this case, we are going to be using Ganache. Ganache is used to set up a personal Ethereum Blockchain to test your Solidity contracts. It spins up a local blockchain on our PC. It can be run locally without any internet connection; hence, one advantage it has over using Remix. It also provides more features when compared to Remix.
Ganache's operations give us insight into what a particular node does in the ethereum blockchain. It builds blocks for us, listens to transactions, gives us some private keys (10) with test ethers that we can use for free. So we can build our application and also test it using Ganache. Once our smart contracts work well on Ganache, we can be sure that they would work well on Ethereum mainnet as well. To use ganache, you would need to download it. You can download it here. Once downloaded, you can go ahead and set it up and start it; Once your Ganache is started, it should look like this:
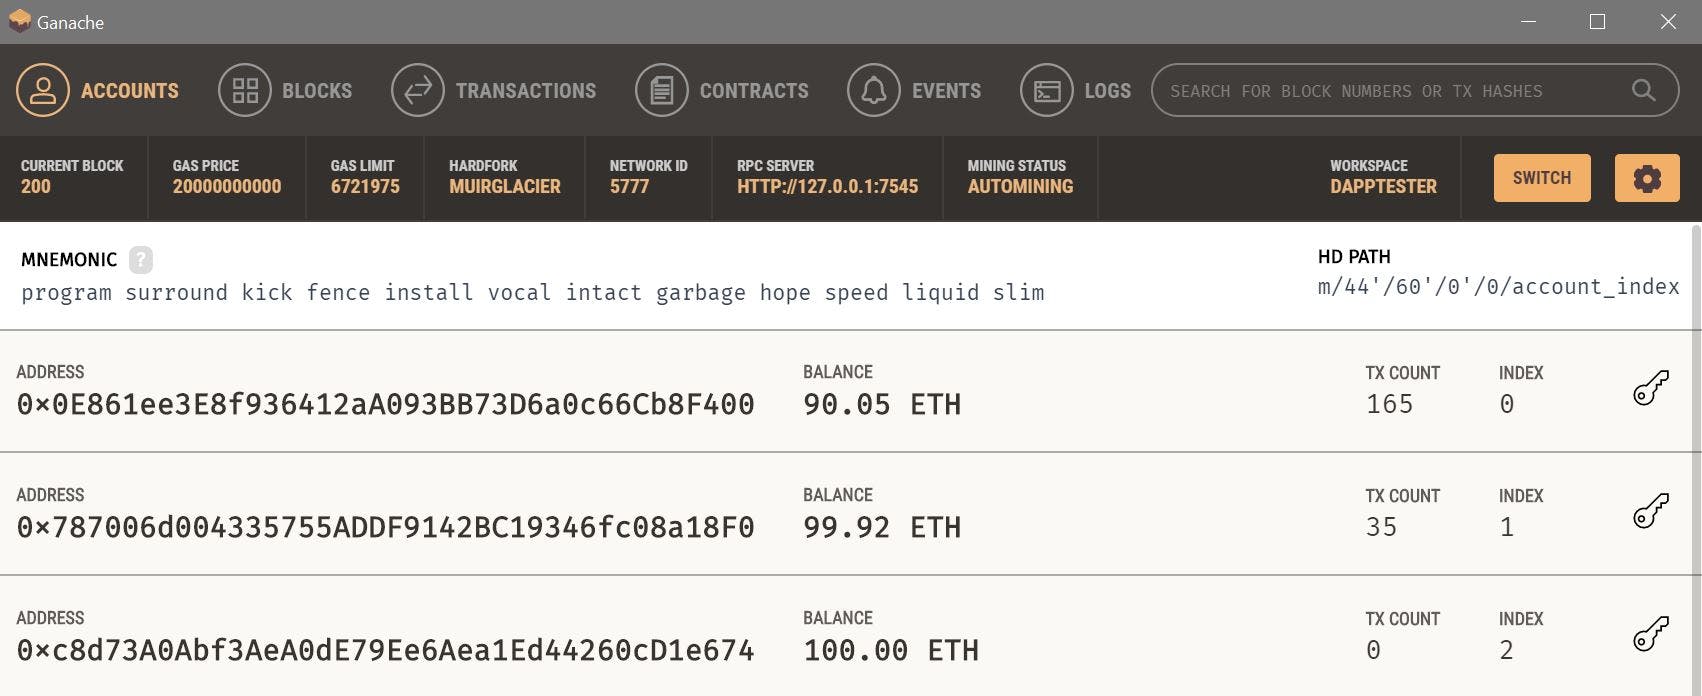
Once we open Ganache, we will see all the accounts available to us. Just above, you would see information like gas price, network ID, server port address.
When we send any transactions to this port through a library, we can ensure that our transactions would be mined and executed and that blocks would be created.
Before we deploy, let's set our account. This is the account to which we would be sending our deployed transactions.
Install web3. After doing that, create a new file. I would call mine utils.js. In the utils file. Write out the following:
    const Web3 = require('web3')
    const web3 = new Web3('http://127.0.0.1:7545')

    console.log(web3)
Once our web3 is successfully installed, we require the web3 package in our utils file. Web3 has had a lot of amazing talks recently. You can read about it here in this Hashnode townhall article. The article also provides for you the best web3 resources available, and beyond that, it also speaks of other blockchain concepts as well as recommends great resources you would need. A great read, to be honest.
Now that we have web3, we would be using it to interact with the blockchain through our Javascript file, which is one of the uses of web3. So to do that, we would create an instance of web3 and link it with the port server as defined in Ganache. We can test and see if web3 is working. Open your terminal and type: 'node utils.'
We see above all the functions that we get to use when we use the web3 object. The above is just a snippet of all the available methods.
We would be leveraging one of the methods to create our accounts.
    const privateKey = 'privatekey'
    const myAccount = web3.eth.accounts.wallet.add(privateKey)

    console.log(myAccount)

    module.exports = {
        web3: web3,
        myAccount: myAccount
    }
To get your private key, click on the key symbol of any account in Ganache, you will see the private key attached to that particular account. For this case, we would be using the first account in Ganache. You must keep this key private. You don't want people to have access to your private key.
Rerun node utils in your console. This time around, you should see your account's address alongside other details.
Now let's deploy our contract. Go to deploy.js file. If you have not created one, create the file. In the file, write:
    const { web3, myAccount } = require('./utils')
    const { bytecode } = require('./artifactOne')


async function deploy() {
    await web3.eth.sendTransaction({
        from: myAccount.address,
        gas: 800000,
        data: bytecode
    })
    .on('receipt', console.log )
}

deploy()
Here, we are deploying our smart contract using a web3 method.
The 'from' specifies the address of the account from which you are deploying. Gas is the fee attached to transactions in the blockchain. It is simply the method of payment of the execution of any transaction. Basically, you are paying all the nodes in the network to store the data you want them to store. Then the data we send to the blockchain is our bytecode. Remember, we said this is what the blockchain understands.
To be sure that our transaction was successful, we leveraged another function called receipt. So once our transaction is successful (i.e., once it has been included in a block), it returns a receipt to us. That receipt is what we console.log back to our terminal. The receipt looks like this.
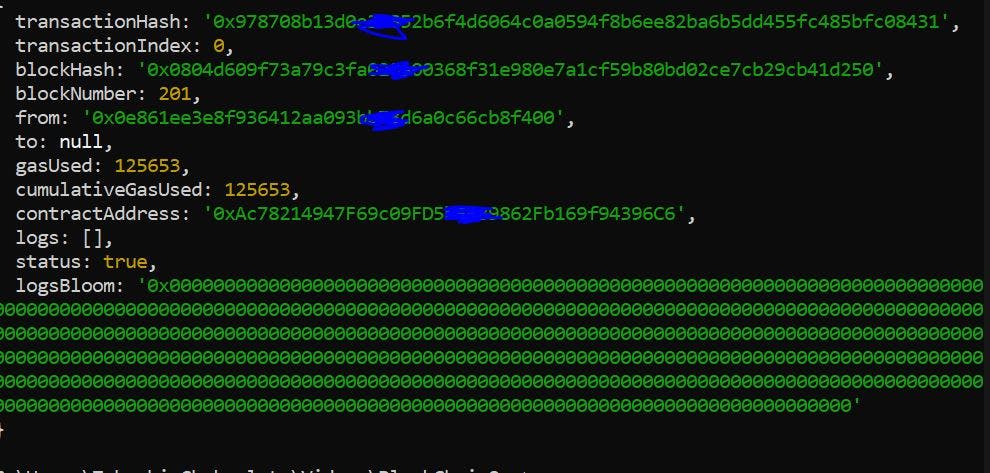
Now from the image above, we now have our contract address. Let us include it in our artifacts file. Go to artifactOne.js and include the contract address as shown:
    module.exports = {
    bytecode: `0xHex_Numbers_Generated`,
    abi: `abi_code`,
    contractAddress: `contract_address`
}
Now that we have deployed our smart contract, we can interact with it. Let's create another file and call it interact.js.
    const { web3, myAccount } = require('./utils')
const { abi, contractAddress } = require('./artifactOne')

let contract = new web3.eth.Contract(JSON.parse(abi), contractAddress)

console.log(contract)
We have our smart contracts deployed on our blockchain, but for us to interact with the smart contract, we would be making use of web3. But remember web3 doesn't know of our smart contract. So we want to make it aware of it. That is why we created a contract object, an instance of a web3 contract. When we run 'node interact' in our terminal, we see the contract. A snippet is shown below.
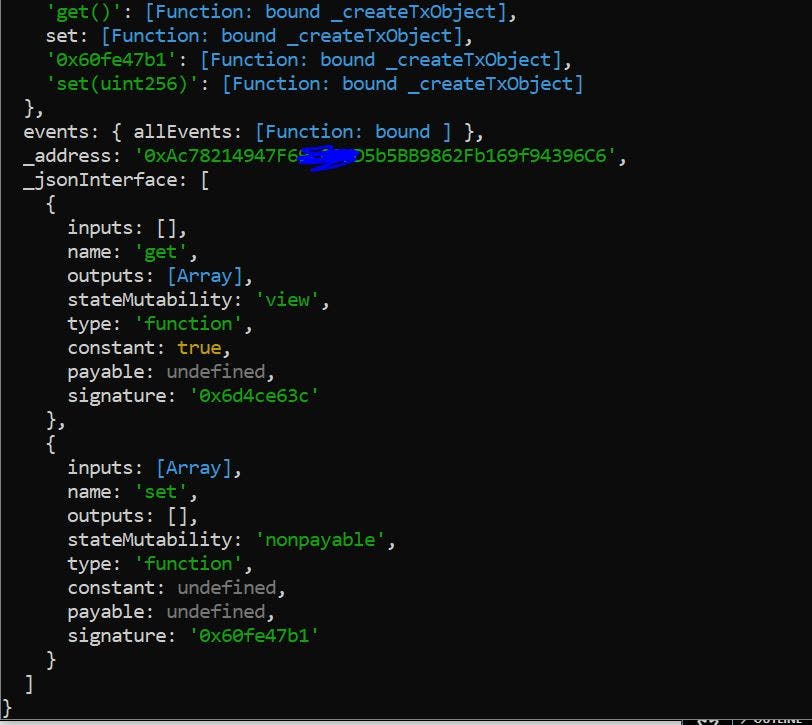
Ongoing, we would be using methods' object in our contract that we just created. You can scroll through your contract, and you will see it. In the meanwhile, above, we can see the _jsonInterface, in which its contents are the functions of the smart contract that we created. We can see the 'get,' and we can also see the 'set.' Update our interact.js file with the following code.
  const { web3, myAccount } = require('./utils')
const { abi, contractAddress } = require('./artifactOne')

let contract = new web3.eth.Contract(JSON.parse(abi), contractAddress)

// console.log(contract)

async function get() {
    let x = await contract.methods.get().call()
    console.log(x)
}
get()

async function set(value) {
    let r = await contract.methods.set(value).send({
        from: myAccount.address,
        gas: 100000
    })
    console.log(r)
}
set(5)
get()
For the first function, which is the get function. We interact with the get method created when we created a contract using web3. You can notice the call() function passed afterward. This function primarily gets the result of the function. It is more like read-only, so in this case, there is no gas fee being paid since all it does is get back the result; it doesn't add or remove from it. For the second function (i.e., set function), recall that we are primarily doing is setting the value of x to an arbitrary value 'y. In this case, 'y' can be any integer. We pass in a value parameter for the function, which we later gave a value when we called the function. Since we are altering values in the blockchain, we cannot use a call() function; instead, we use a send() function. What the function basically does is to send in a/some value to the blockchain and alter certain values in the blockchain; in our case, we are altering the value of 'x.' The send() takes two parameters, which is the 'from' (i.e., the address from which we are making this change from which is also the address that would pay for the gas fee) and the 'gas' parameter, which holds gas value from which the blockchain nodes would charge from.
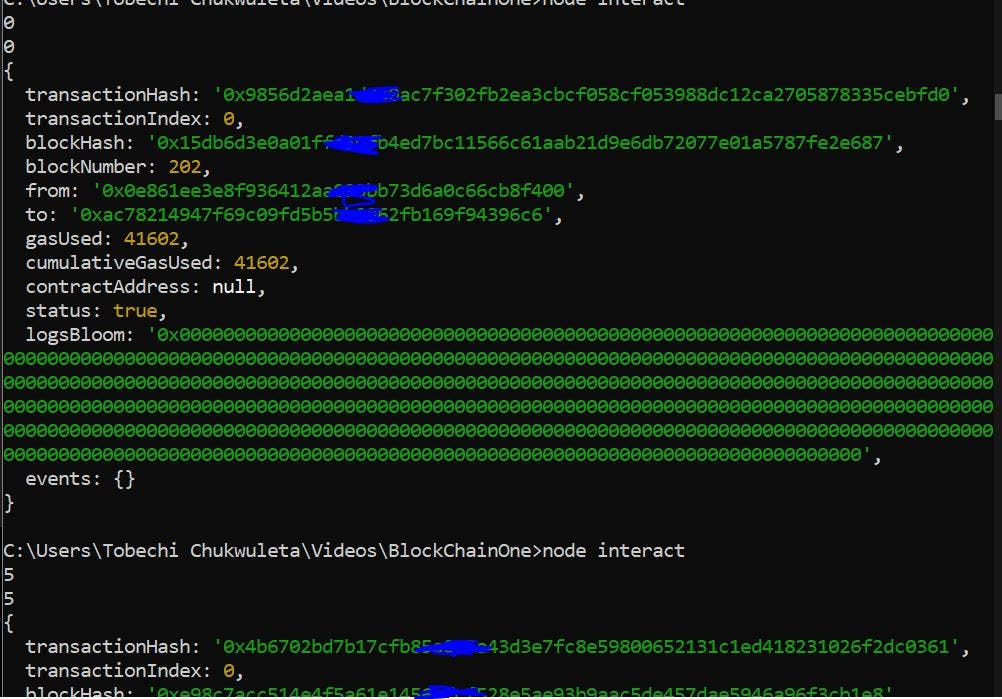
From the image shown, we can see the receipt. The 'to' value was null when we first deployed our contract. Then we were simply broadcasting the value to every node on the blockchain, making it aware of our contract. But currently, we see that the 'to' value has a contract value because, in this case, we are sending our change to a particular address node and not the entire network.
When we ran our file, we saw that, at first, the result was 0. This was when it hit the first get() function, which when we initialized it in our .sol file, we didn't give it any value. We just initialized it, so it takes a default value of 0. When then see our receipt, which is a result of the set() function that we called, here we gave x a new value of 5, of which after the receipt we see the value.
For our actual from the end, let's create an index.html file. Place the following code in your file:
<!DOCTYPE html>
<html lang="en">
<head>
<meta charset="utf-8" />
<title>Demo</title>
</head>
<body>
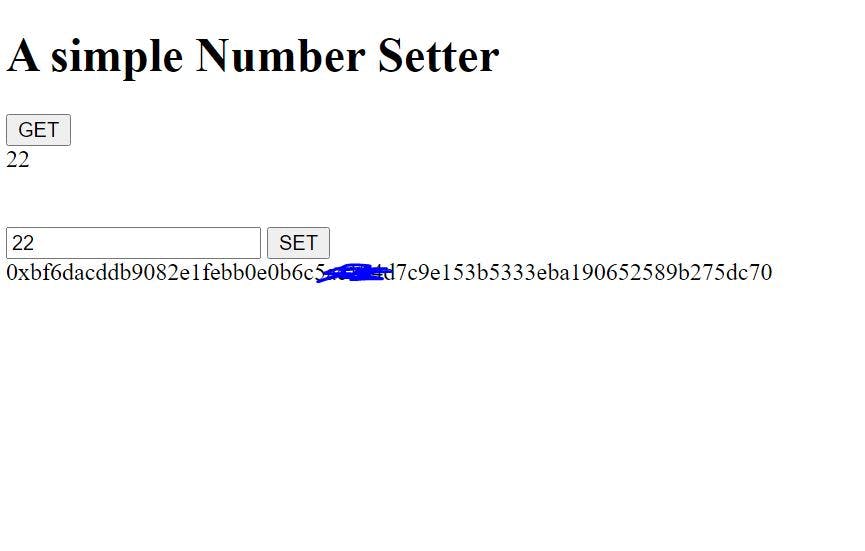
<h1>A simple Number Setter</h1>
<button id="get">GET</button>
<div id="resultOfGet"></div> <br><br>
<input id="value" type="number">
<button id="set">SET</button>
<div id="resultOfSet"></div>
<script src="./interact.js" language="javascript"></script>
</body>
</html>
}
For us to be able to interact with our interact.js file, we need to update the file. So that the final code looks like the following:
const { web3, myAccount } = require('./utils')
const { abi, contractAddress } = require('./artifactOne')

let contract = new web3.eth.Contract(JSON.parse(abi), contractAddress)

// console.log(contract)

async function get() {
    let x = await contract.methods.get().call()
    // console.log(x)
    return x
}
// get()

async function set(value) {
    let r = await contract.methods.set(value).send({
        from: myAccount.address,
        gas: 100000
    })
    // console.log(r)
    return r.transactionHash
}
// set(5)
// get()

window.addEventListener('load', () => {
    document.getElementById("get").onclick = () => {
      get().then((r) => {
        document.getElementById("resultOfGet").innerHTML = r
      })
    }
    document.getElementById("set").onclick = () => {
      val = document.getElementById("value").value
      set(val).then((r) => {
        document.getElementById("resultOfSet").innerHTML = r
      })
    }
  })
We can see that we added some codes and updated what we had. When the browser loads, we want to run the get function when the get button is clicked. As you can see, the get function now returns the value 'r' used at the div where we display our number value. We also want to run the set function when the set button is clicked. Once the button is clicked, we want to take the value passed in the input as the new value of our get function. So we run the set function with that value and then return the transaction's hash, which is basically the hash value of the entire transaction that we are sending to the blockchain.
And that is it... well, almost
When we try to run our code and click the value, notice that nothing happens when you click the button. This is because the browser doesn't understand the format and pattern used in the interact.js file. To make the browser understand and work with our interact.js file, we need to install one more package, which would basically be the last package we would use for this project. Browserify basically helps build a bundle that you can serve up to the browser in a single script file. What browserify does for us is take the interact.js file and convert it to a language that our browser would be able to parse and connect with.
Go to your console and type 'npm i browserify.' Once the package installs, type in your console 'browserify interact.js > finale.js.' This does just as we have said, but this time it takes the new language content that the browser understands and saves it in a new file, which we have called finale.js (you can name it whatever you want to name it). Once it is complete, you will see the file (finale.js) automatically added to your project folder.
So in your HTML file, under your script tag, replace interact.js with finale.js. Now let us run our file.

Booooooommmmmmmmmmmmmmm..... And we are done
The whole purpose of this tutorial is to understand all of the concepts and operations of the blockchain. Here we built from scratch up; there were many things that we had to do manually. In the next article, we would build our own currency and wallet. We won't have to be building things manually, but then we would be leveraging tools that would be doing things for us. One of those tools is 'Truffle.'
If you got here and all your programs ran successfully, and you understand all of the terms used in this article, I say a big well done to you. If you didn't, kindly drop a comment, I would be happy to answer them for you.
Like, share, share, share, share, and shareeeeeeeeeeeeeeeeeeeee...
You can also connect with me on Twitter and LinkedIn. Ese oo