Learn Bitcoin... Create Your first BTC wallet and make transactions with it


Imagine building your software application without integrating with a third party such as Paystack, Stripe, Paypal, Flutterwave, e.t.c.
Imagine having to transfer and receive money without a central authority monitoring your transactions or having a central bank preventing you from doing transactions more than $20.
Imagine not having to depend on traditional currency, whose value is dropping by the day.
Well... Welcome to the world of Bitcoin.
Welcome to a completely decentralised system, where you don't have a third party preventing you from doing mind-blowing things. Bitcoin’s network offers developers an open-source, trustless, decentralised, self-hosted digital cash system.
It's incredible to know about Bitcoin and the different possibilities the field offers you. As much as I want to talk to you about Bitcoin, I have a goal to help you create your first Bitcoin wallet and perform your first (or several) transactions in a very understandable way. So if you don't have an understanding of the system, I'd advise you to read up about bitcoin in this Bitcoin Book. Trust me on this; it would help you a lot.
One more thing, I would be using a lot of Bitcoin terminologies, so if you have not encountered Bitcoin from a researcher, developer or a miner's perspective, you really should read that book. Gracias.
Let's get started...

Before we dive right in, I want to point out that at the end of this tutorial, you should have a general understanding of how bitcoin transactions work and should be able to send Bitcoin to anyone from your wallet.
So if you are a developer (preferably a Javascript developer) and want to learn a little workaround in Bitcoin, you should hang around. P.S: I got some goodies at the end of the article; I'm sure you would love them.
First off, let's define specific vital terminologies.
The Blockchain
The blockchain can be described as an immutable distributed database of a global log of transactions. A block in the blockchain can be likened to a record in traditional databases.
Blockchain is a decentralised record-keeping technology that uses digital ledgers to break it down further. Every user will have their ledger saved on their local drive. Every line item (i.e. Block) in this ledger will be reviewed/validated by each user and, once validated, cannot be deleted or modified (i.e. immutable).
While trying to explain to a complete novice, I'd say the blockchain is a constantly growing list of information. That information (blocks) and all these blocks are linked together. Each block is connected to the preceding and the following block. Like ladders fastened together on a pole, you cannot just remove the middle ladder and expect others to be standing well on the pole; there is every probability they would fall. Because the ladders are fastened so well together, it is impossible to remove any random ladder; you have to start from the one touching the floor and keep unfastening till you get to the one on top. This is similar to blockchain, but then, in this case, it is hard (practically impossible) to unfasten blocks from each other.
Bitcoin Transactions
In straightforward terms, a bitcoin transaction transfers bitcoin (digital currency) from one bitcoin wallet to another, which gets included in the blockchain.
Ideally, to get started with working and developing with Bitcoin, we would need to meet specific criteria. Remember when we were defining the blockchain, we mentioned that every user on the system would need to have a copy of the ledger (the blockchain). There are two main advantages to running a full node (i.e having a copy of the ledger) this is to be able to validate the accuracy of transactions and also monitor the health and security of the Bitcoin blockchain. Hence, running a full node is of great importance, especially for someone wanting to leverage the Bitcoin network to build a wallet or any kind of application, this is so that they can efficiently perform and validate transactions on the blockchain. We agree that the blockchain is like a record keeper of all transactions, and as more transactions are made, this ledger will keep increasing, which causes a demand for more memory space to store the blockchain. As of February 2021, according to research, the size of Bitcoin was estimated at 324 gigabytes.

But for someone just learning the ropes, it might seem discouraging having to use that much disk size to store transactions, I mean not everyone even has that much storage space in the first place. Imagine having a system and dedicating over 300 gigabytes to store the blockchain, which tends to increase by half over the shortest time possible. This is just to record all the transactions ever created for verification and validation purposes. It doesn't include other space-consuming factors. To solve this, there are networks set in place such as to enable you to run your test transactions. These networks include signet and regtest. Regtest is for private use and performing regression testing among other things, while Signet is a public network which gives a more realistic simulation of the Mainnet. Signet allows for other larger-scale tests, of Bitcoin core and other software. You can read about the networks in the Bitcoin Book. The great news is that for this article, we would not need to download the entire bitcoin blockchain, as we would be working on a test environment sagainst Mainnet (a completely developed blockchain platform for users to send and receive cryptocurrency transactions) since this is a test application.
Requirements We would start by creating a wallet address. But before we do that, we must have the basic requirements. -Node installed,
- A code editor, and most important
- A good knowledge of Javascript.
- Read through the Bitcoin book
A bitcoin address indicates the source or destination of a Bitcoin payment. The bitcoin address is used to direct bitcoin during a transaction rather than store it. A bitcoin address consists of a combination of numbers and letters. Currently, there are several Bitcoin address output types which include P2PKH, P2PK, Nested P2WPKH, P2WPKH, P2MS, Nested P2WSH, P2TR e.t.c.
P2PKH: P2PKH stands for Pay-to-Pubkey Hash, which means pay to a hash of the recipient's public key. P2PKH (also known as legacy address) is the first Bitcoin address format. Although old, it still works well to this day. The only issue with this address format is that sending Bitcoin from a P2PKH address is likely to require more fee than sending from a segwit address. P2PKH address transactions are larger in size, and one way to identify them is that their addresses start with a 1. So, for example, 1BvBMSEYstWetqTFn5Au4m4GFg7xJaNVN2, we know for sure that this address is a P2PKH address because it begins with a 1.
P2SH: Unlike P2PKH, P2SH (Pay to script hash) begins with a '3' instead of '1'. P2SH supports more functionality than the legacy address. E.g P2SH is used for multisig transactions. Multisig transactions are transactions that require multiple digital signatures to authorise a transaction. Depending on the number of signers set, with multisig, one user is not enough to sign a transaction.
P2WPKH: Native SegWit (P2WPKH) addresses start with bc1q. Native SegWit addresses reduce the amount of information stored in the transaction saving an additional 16% over the P2SH addresses, and 38% over legacy addresses. They do this by keeping the signature and script in the witness and not within the transaction.
N.B: Segwit stands for segregated witness.
P2TR: Taproot addresses start with bc1p. It is a new upgrade in Bitcoin's network which went live on November 14, 2021. The upgrade is primarily aimed at making the cryptocurrency's network more private, secure, and scalable.
How is a Bitcoin address generated?
A random string consisting of 64 (hex) characters is generated first to generate a Bitcoin address. This can be any number between 0 and n-1 where n is a constant and its value is n = 1.15781077. The string is then fed to a SHA256 hashing algorithm, resulting in a new 256-bit number generated. This newly generated value is our private key. The public key is generated from the private key using secp256k1, which is a curve of Elliptic Curve Digital Signature Algorithm. A public key is generated using a formula P = p G, where p is the private key and G is the generator point (a defined point on the secp256k1 curve). To get the Bitcoin address, we apply the SHA256 algorithm on the public key and then compute a RIPEMD160 hash of the result, i.e
A = RIPEMD160(SHA256(P)), where P is the public key, and A is the Bitcoin address.
Enough of all the boring stories. Let's skip to the good part. N.B: Although they seem boring, they are essential, so please, when done with this article, go back to it and understand it more.

With that said, let's go ahead and create our first wallet addresses. Let's get started by creating a Node project. Create a new folder, navigate to the directory of the created folder using the command prompt and type:
npm init -y
This would generate a package.json file for that particular folder. Once the file is created, then the project is created as well. Go ahead and create a file; name it whatever you want to call it.
It would be good to note that there are many ways to create a Bitcoin wallet address using Javascript. This is so because there are bitcoin packages that can help with this, some of these packages include bitcoinjs-lib, bitcore-lib, coinkey, e.t.c.
I will be showing and explaining how to create a wallet using all three packages. Go ahead and install the following using npm "bitcoinjs-lib, bip39, bitcore-lib, axios, and bip32" N.B: For the bip32 package I'd advise you to install the package "^2.0.6", as the latest version doesn't contain certain functionality (.fromSeed) we would be working with.
Let's get started.
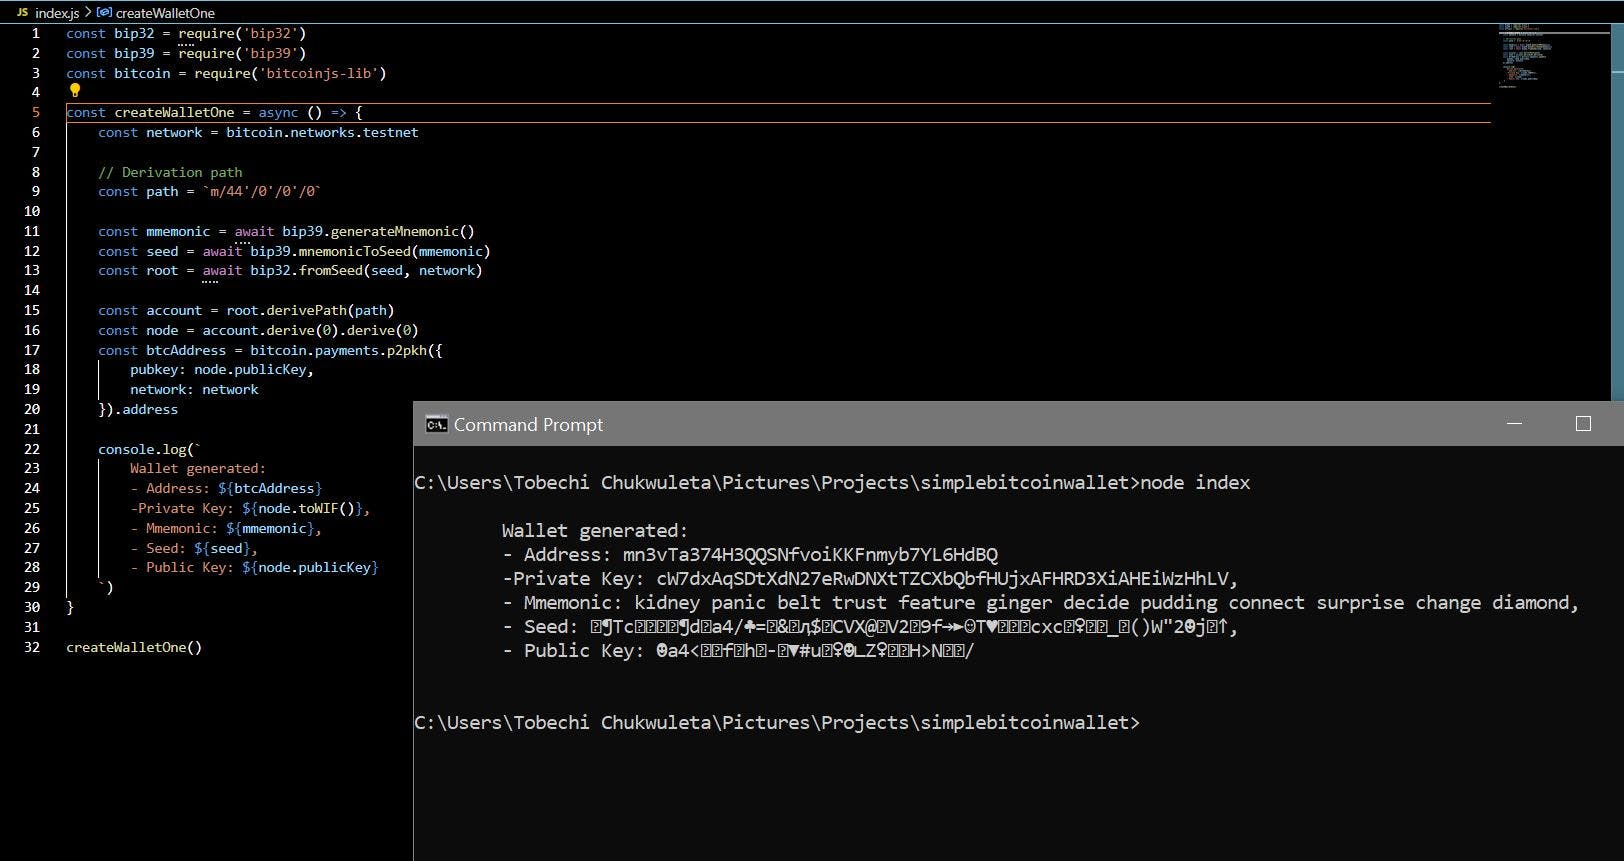
const bip32 = require('bip32')
const bip39 = require('bip39')
const bitcoin = require('bitcoinjs-lib')

const createWalletOne = async () => {
    const network = bitcoin.networks.testnet

    const path = `m/44'/0'/0'/0`

    const mmemonic = await bip39.generateMnemonic()
    const seed = await bip39.mnemonicToSeed(mmemonic)
    const root = await bip32.fromSeed(seed, network)

    const account = root.derivePath(path)
    const node = account.derive(0).derive(0)
    const btcAddress = bitcoin.payments.p2pkh({
        pubkey: node.publicKey,
        network: network
    }).address

    console.log(`
        Wallet generated:
        - Address: ${btcAddress}
        -Private Key: ${node.toWIF()},
        - Mmemonic: ${mmemonic},
        - Seed: ${seed},
        - Public Key: ${node.publicKey}
    `)
}

createWalletOne()
What did we do? We started first by importing the necessary model. For this wallet creation, we are going to leverage bitcoinjs-lib. So we imported the library. Next, we defined the network we would be working on because this is a test project, in that we would not be performing transactions with test bitcoins. For a real-world application, we would set our network to bitcoin and not testnet using the following:
bitcoin.networks.bitcoin
We then go ahead to generate our wallet key. We started by generating the mnemonic key. For those who have encountered Metamask, Metamask usually provides 24-word phrases while creating an account. The mnemonic key can be either 12 words in length or 24 words long. The mnemonic key represents a large randomly generated number as a sequence of words, making it easier for humans to store. They are used to generate key pairs and unique to every key. Metamask would always advise that you keep your Mnemonic key safe and out of the eyes of random people; this is because, whoever has access to those phrases, basically has access to your account. Also, if you forget your key or want to use your wallet on another device, it is this key that you would input that would help you seamlessly retrieve your wallet details.
After generating the mnemonic words, these words are then used to create a seed, which can generate extended keys in a hierarchical deterministic wallet. We then use the seed to derive the root, which is used to derive the accounts, giving birth to the private key, public key, and wallet address.
Unto the next.
Creating a wallet with coinkey and bitcore is quite more straightforward with lesser lines of codes than it was with bitcoinjs-lib.
Using coinkey:
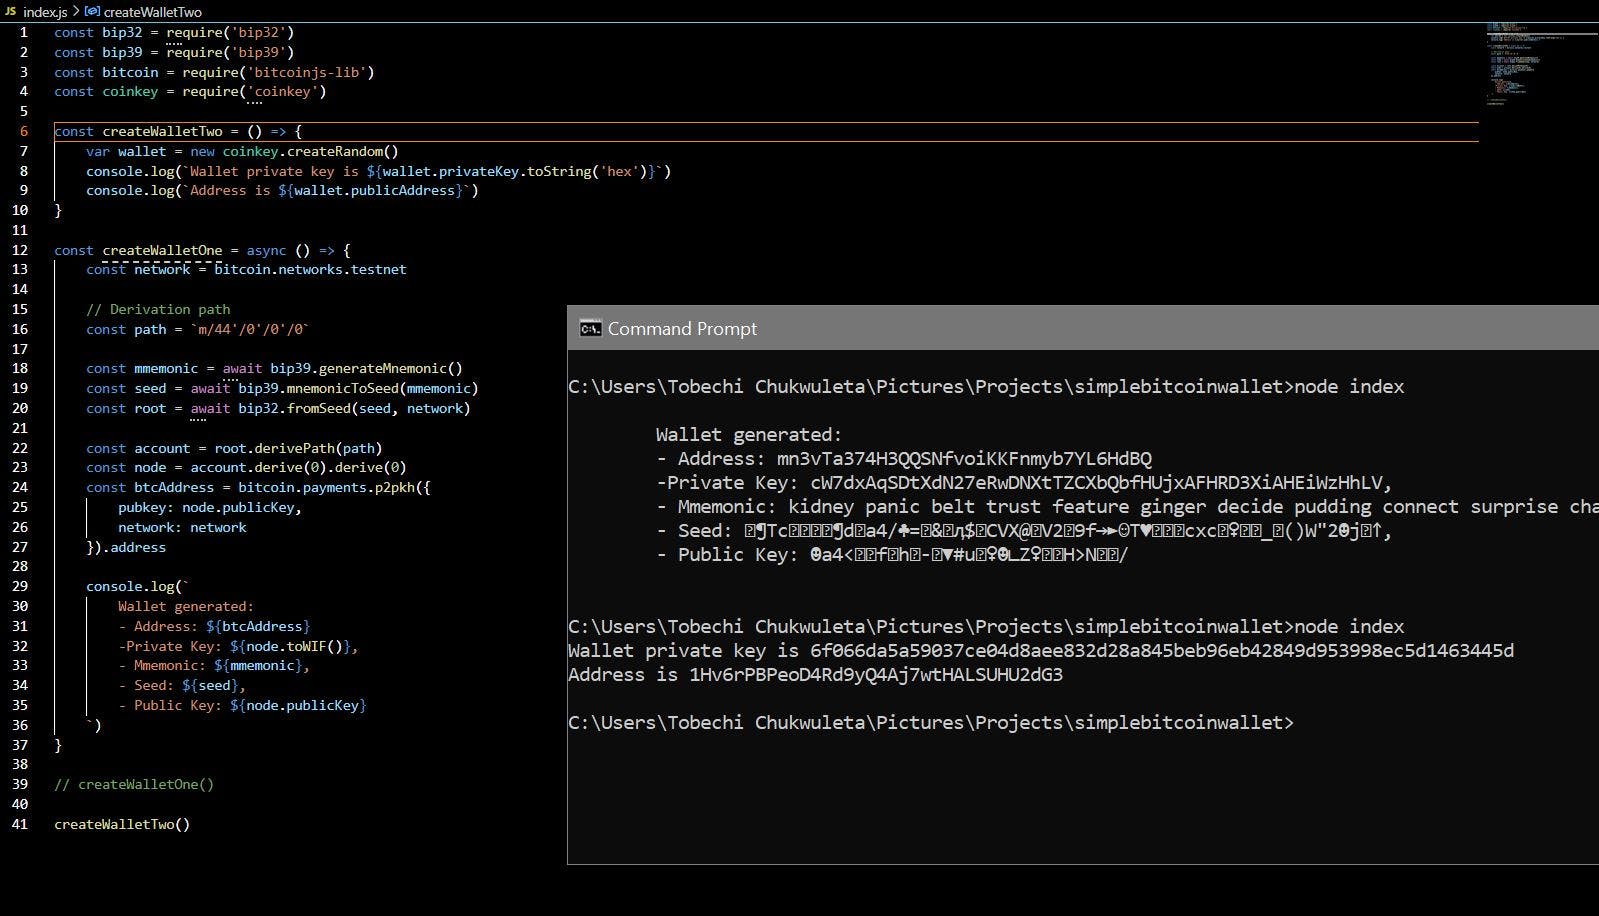
const coinkey = require('coinkey')

const createWalletTwo = () => {
    var wallet = new coinkey.createRandom()
    console.log(`Wallet private key is ${wallet.privateKey.toString('hex')}`)
    console.log(`Address is ${wallet.publicAddress}`)
}


createWalletTwo()
As I said, coinkey is relatively straightforward. We started off by importing the coinkey library; after that, we created a function in which we would write our code responsible for creating a wallet for us using coinkey. Coinkey has an inbuilt function responsible for creating random key pairs. We called this same function and assigned the resulting keys to the variable wallet. All we had to do is separate the key into private and public keys for the user or developer to make use of.
So far, we have been able to create wallet addresses using two different methods. The following snapshot shows the combined code for the two wallet creation methods and their resultant output.
The last method we would be learning in creating our Bitcoin wallet address is using Bitcore.
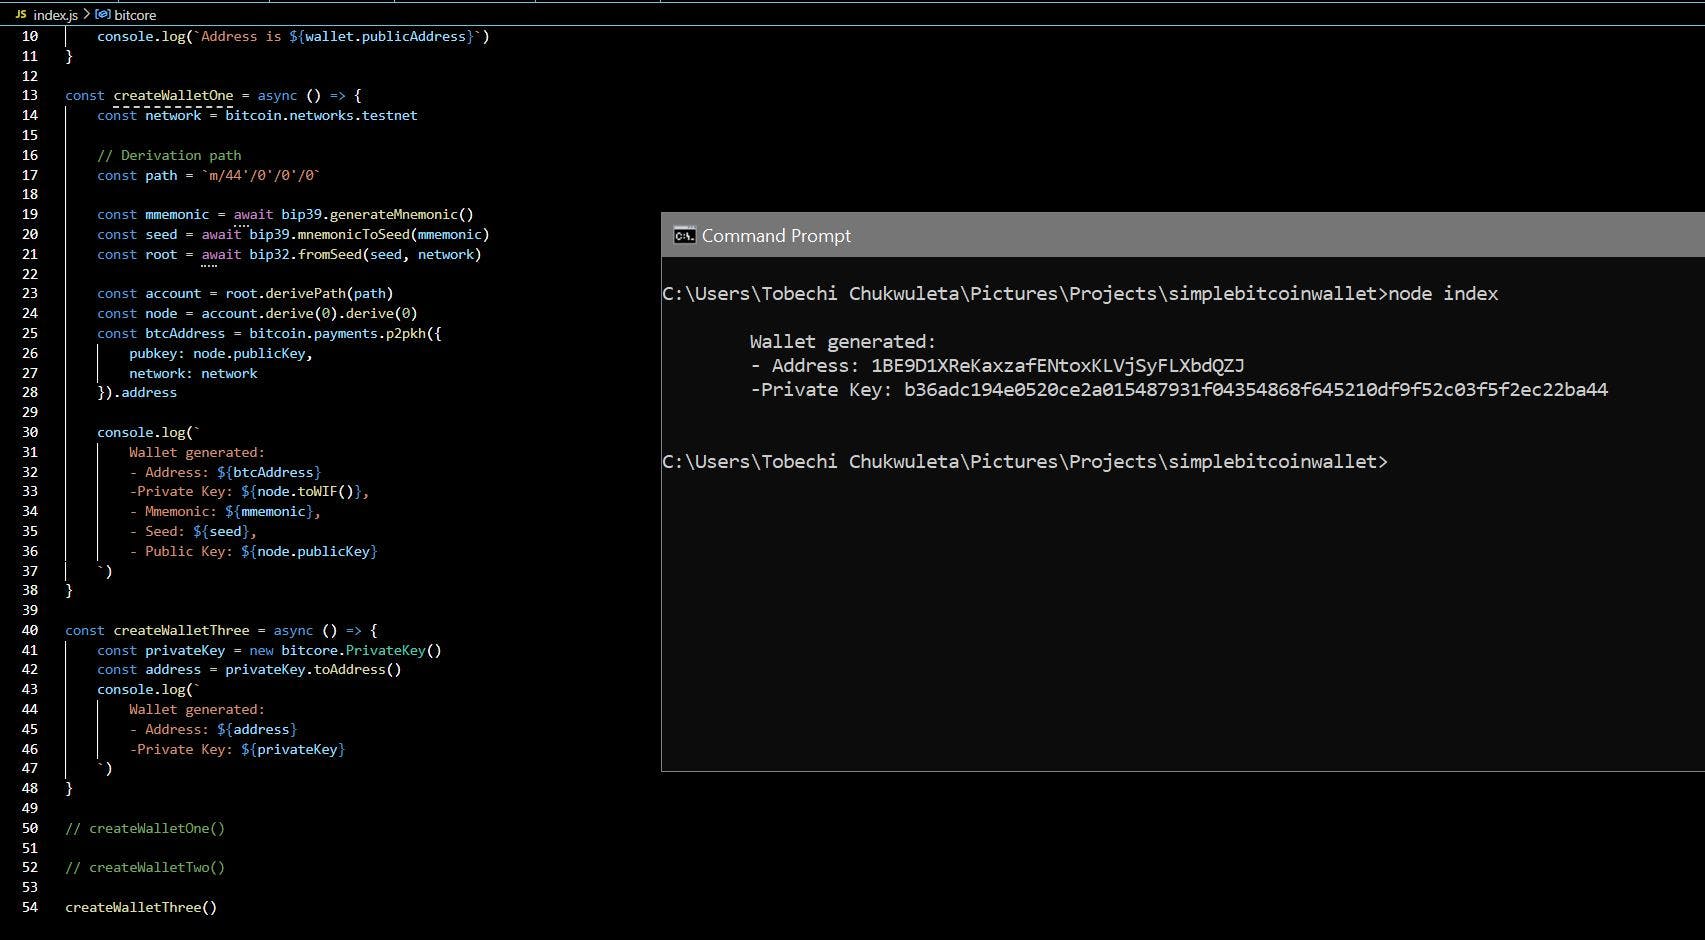
const bitcore = require('bitcore-lib')

const createWalletThree = async () => {
    const privateKey = new bitcore.PrivateKey()
    const address = privateKey.toAddress()
    console.log(`
        Wallet generated:
        - Address: ${address}
        -Private Key: ${privateKey}
    `)
}
Another simple method, yea? Told you.
All we had to do here was to import the required library, leverage the library to generate a new private key, and from the private key, we can generate our wallet address.
Here is a snippet showing the code and the result:
Now we are done learning how to create your wallet address, let's go to the second segment of this article and which should be to you the most exciting part - Creating Bitcoin transactions.

Before we start writing code logic responsible for performing the transaction, it is important to understand the workflow for Bitcoin transactions. Unlike the traditional banking system, where you just have to transfer money from your account in your currency to another account, Bitcoin doesn't work that way.
To send Bitcoin, you must have access to a public and private key containing the Bitcoin values we want to send. In Bitcoin, the public key holds our Bitcoin balance which we call "Unspent Transaction Output (UTXO)". A UTXO is all the amount of cryptocurrency (Bitcoin in our case) not spent during a transaction. Bitcoin is a set of coins with programs or conditions for spending them. So your wallet has unspent coins that it can spend. Each coin has a script and an amount. So in order to spend a coin, you must provide input for that coin that fulfils the spending conditions. A UTXO is a subset of the coins that you can fulfil the spending conditions of. Let me quickly explain a concept which would aid my explanation of UTXOs. Assuming 5 people give me a $100 bill each, and then an honest fellow promises me $200, in as much as I can be certain that I would have $700 soon if an urgent bill arises, I only have access to $500 for which I can use to sort myself.
Since there is no bank or third party in Bitcoin, how does this work?
Assuming I have 2 BTC and want to send 0.5 BTC to Mr C, I would have to specify to the wallet to send 0.5 BTC to the recipient, 1.499 BTC back to me, and the rest is used as a transaction fee or miner's fee.
Why do I have to specify the remaining amount to be sent back to me?
Remember in a traditional system, a body controls the flow of cash from a user to another user, but in Bitcoin, there is nobody to control what money leaves your account and what money remains, maybe it is safe to say that you are your own 'body'. So when performing Bitcoin transactions, you would select outputs that would enable you to pay all the outputs conveniently while making allowance for fees. All inputs are spent in a transaction. If an address received 100 bitcoins in a transaction and just wants to spend 1 BTC, the transaction must spend all 100. To avoid Bitcoin losses, the solution is to use a second output as our change wallet (which is our spending wallet), which returns the 99 leftover bitcoins to you, so in creating transactions we need to specify how much we are sending, how much we are expected to have a balance, and how much we are meant to pay a transaction fee. This fee is required to validate every transaction. The change is optional and only comes in when the input amounts are greater than the output amounts plus fees. N.B: If the change address is not specified, all other bitcoin values from an input (minus the amount specified to send), would be used as a transaction fee. So adding a change address is important. So for every Bitcoin transaction made, there is expected to be a certain amount of BTC that is returned back to the sender. Each and every BTC returned to the sender is referred to as UTXO (Unspent transaction output). The sum total of all the UTXOs is what we can refer to as the user's Bitcoin balance, and it is this UTXO that a user spends money from. This is how a Bitcoin transaction works.
How then can we achieve this?
A Bitcoin transaction consists of four main sections: inputs, outputs, amount, and metadata on the underground. The amount is the amount of bitcoin to be sent on the transaction. The metadata is an optional field. Here you can pass a message alongside making the transaction, and the message max size is exactly 80bytes. The inputs consist of the UTXOs i.e. where the money would be spent, and the output consists of the address of the destination wallet. Consequently, the output would become the input. Using an example to explain this: If I send 1BTC to a certain Ada, Ada's UTXO has increased by 1 BTC, giving Ada more spending power. So if Ada wants to send 0.5 BTC to Bob, Ada can send from the 1 BTC that I initially sent her, making the output from my transaction becomes the input for her transaction.
To implement transactions in BTC, first, we need to get all the unspent transaction outputs available to the spender. This UTXO becomes the transaction input. We then need to calculate the transaction fee and then check if we have enough balance to cover the transaction (amount to be spent plus transaction fee). If the checks are complete, we can set the transaction inputs, set the change address, set the transaction fee, sign the transaction, serialise the transaction and then broadcast the transaction. These are all the processes involved in performing a Bitcoin transaction. We would be explaining all the processes as we write the code.
For us to be able to make a transaction, we need to have Bitcoins available to us, yea? We then need to create a new bitcoin wallet address and load it with some bitcoins, or better still, use any of the wallet addresses we initially created and then populate it with test bitcoin. To start, I would be creating two wallet addresses, one to act as our spender and the second would be our receiver.
const bitcoin = require('bitcoinjs-lib')
const bitcore = require('bitcore-lib')


const createWallet = async () => {
    const network = bitcoin.networks.testnet //.bitcoin
    // Derivation path
    const path = `m/44'/0'/0'/0`
    const mmemonic = await bip39.generateMnemonic()
    const seed = await bip39.mnemonicToSeed(mmemonic)
    const root = await bip32.fromSeed(seed, network)
    const account = root.derivePath(path)
    const node = account.derive(0).derive(0)
    const btcAddress = bitcoin.payments.p2pkh({
        pubkey: node.publicKey,
        network: network
    }).address

    console.log(`
        Wallet generated:
        - Address: ${btcAddress}
        -Private Key: ${node.toWIF()},
        - Mmemonic: ${mmemonic},
        - Seed: ${seed},
        - Public Key: ${node.publicKey}
    `)
}

createWallet()
I called the function twice to create the two Bitcoin wallet address and a private key that I would need. Now that we have two wallet addresses, let's load one up with test Bitcoin. You can google Bitcoin faucet to get test Bitcoins. We can get test Bitcoin from this or this. Let's go-ahead to make our transactions. I'd write out the code first and then explain them one after another.
const bitcoin = require('bitcoinjs-lib')
const bip32 = require('bip32')
const bip39 = require('bip39')
const axios = require('axios')
const bitcore = require('bitcore-lib')
const dotenv = require('dotenv')
dotenv.config()


const makeTransaction = async (fromAddress, toAddress, amount) => {
    const network = bitcoin.networks.testnet
    const Network = 'BTCTEST'
    let inputs = []
    let totalAvailableAmount = 0
    let inputCount = 0
    const amountSatoshi = amount * 100000000
    const outputCount = 2

    const privateKey = `{process.env.privateKey}`

    let res = await axios.get(`https://sochain.com/api/v2/get_tx_unspent/${Network}/${fromAddress}`)
    let data = res.data.data

    data.txs.forEach(element => {
        let utxo = {}
        utxo.satoshis = Math.floor(Number(element.value) * 100000000)
        utxo.script = element.script_hex
        utxo.address = res.address
        utxo.txid = element.txid
        utxo.outputIndex = element.output_no

        totalAvailableAmount += utxo.satoshis
        inputCount += 1
        inputs.push(utxo)
    });

    console.log(totalAvailableAmount)
    console.log(amountSatoshi)

    transactionSize = inputCount * 146 + outputCount * 34 + 10 - inputCount;
    //fee = transactionSize * 7
    fee = 255
    if(totalAvailableAmount - amountSatoshi - fee < 0) throw new Error("Balance is too low for this transaction")

    const transaction = new bitcore.Transaction()
    transaction.from(inputs)
    transaction.to(toAddress, Math.floor(amountSatoshi))
    console.log(transaction)
    transaction.change(fromAddress)
    transaction.fee(fee)
    transaction.sign(privateKey)
    const serializeTxn = transaction.serialize({ disableDustOutputs: true })

    console.log(`Serialized Transaction: ${serializeTxn}`)


    // broadcast transaction
    const txn = await axios({
        method: "POST",
        url: `https://sochain.com/api/v2/send_tx/${Network}`,
        data: {
        tx_hex: serializeTxn,
        },
    });
    const txnOutput = txn.data.data
    console.log(`Finale: ${txnOutput}`)
    return txnOutput
}

console.log(makeTransaction('n4WvGJJTpY95gUpagLbuP3MXF2BVypfhGc', 'mtVE8anM63kQcgKUC6oQQD9K6xiV4wsr7q', 0.000001))
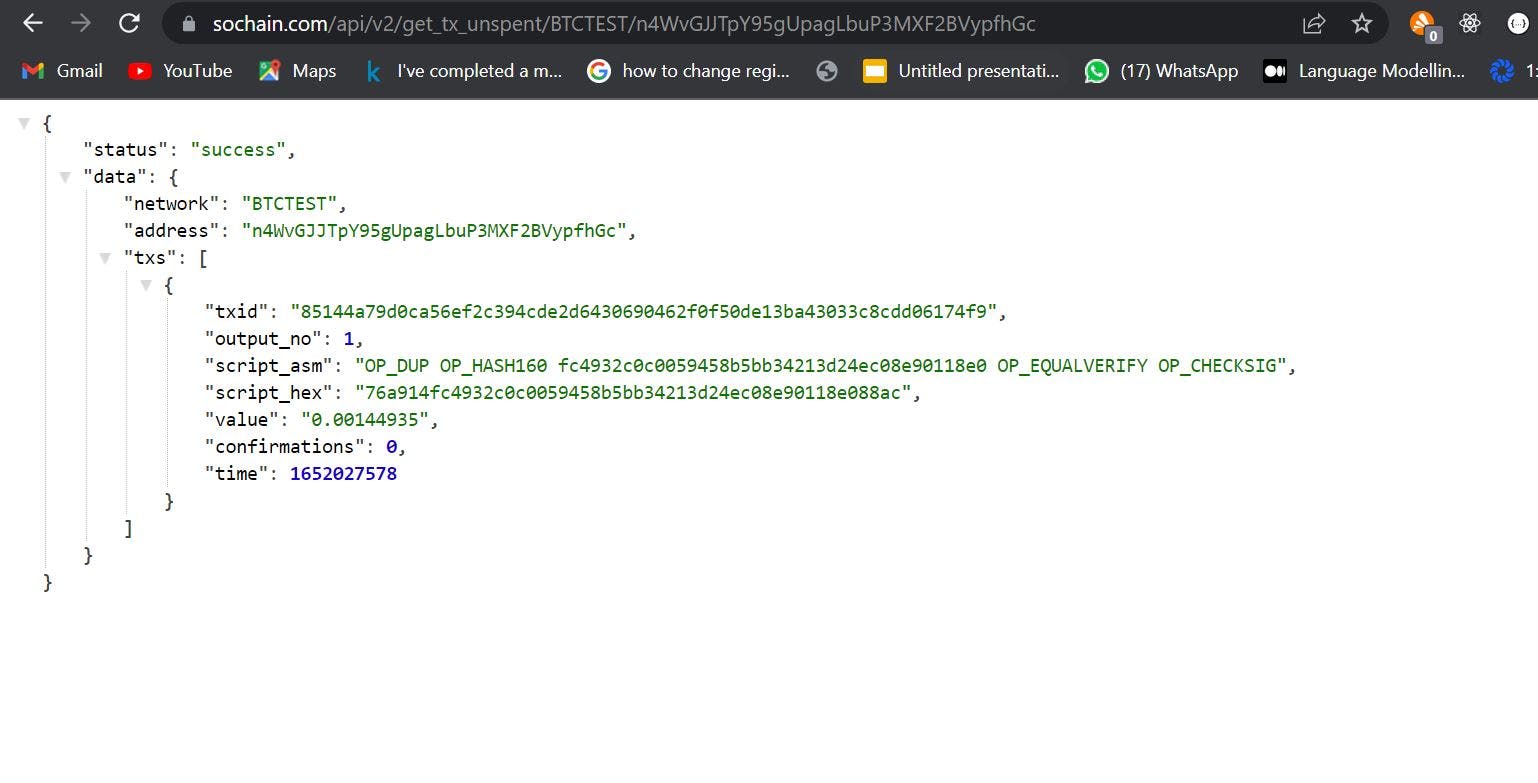
Here is all the code needed to make our first transaction. We create a function that takes in three parameters: the Bitcoin wallet address from which we want to spend our Bitcoin, the recipient address, and the amount value we want to send. We start up by defining the environment, setting our network to be testnet, our private key, and our input to be an input array, and we convert the amount we want to send to satoshi. Satoshi is the smallest unit of the Bitcoin cryptocurrency. Just as we have Kobo to Naira, Cent to Dollar, the same way we have Satoshi to Bitcoin. Bitcoin transactions are processed in satoshis which is about 100 millionth of one Bitcoin. So regardless of the amount we want to send, we need to convert the value from Btc to the satoshi; that is what we did and assigned the resulting value to the 'amountSatoshi' variable. For us to be able to see all the UTXO available to our wallet and for our program to view our UTXO too, we use the SoChain block explorer. For example, if we pass our address to it like: sochain.com/api/v2/get_tx_unspent/BTCTEST/m..
we would get something like bellow:
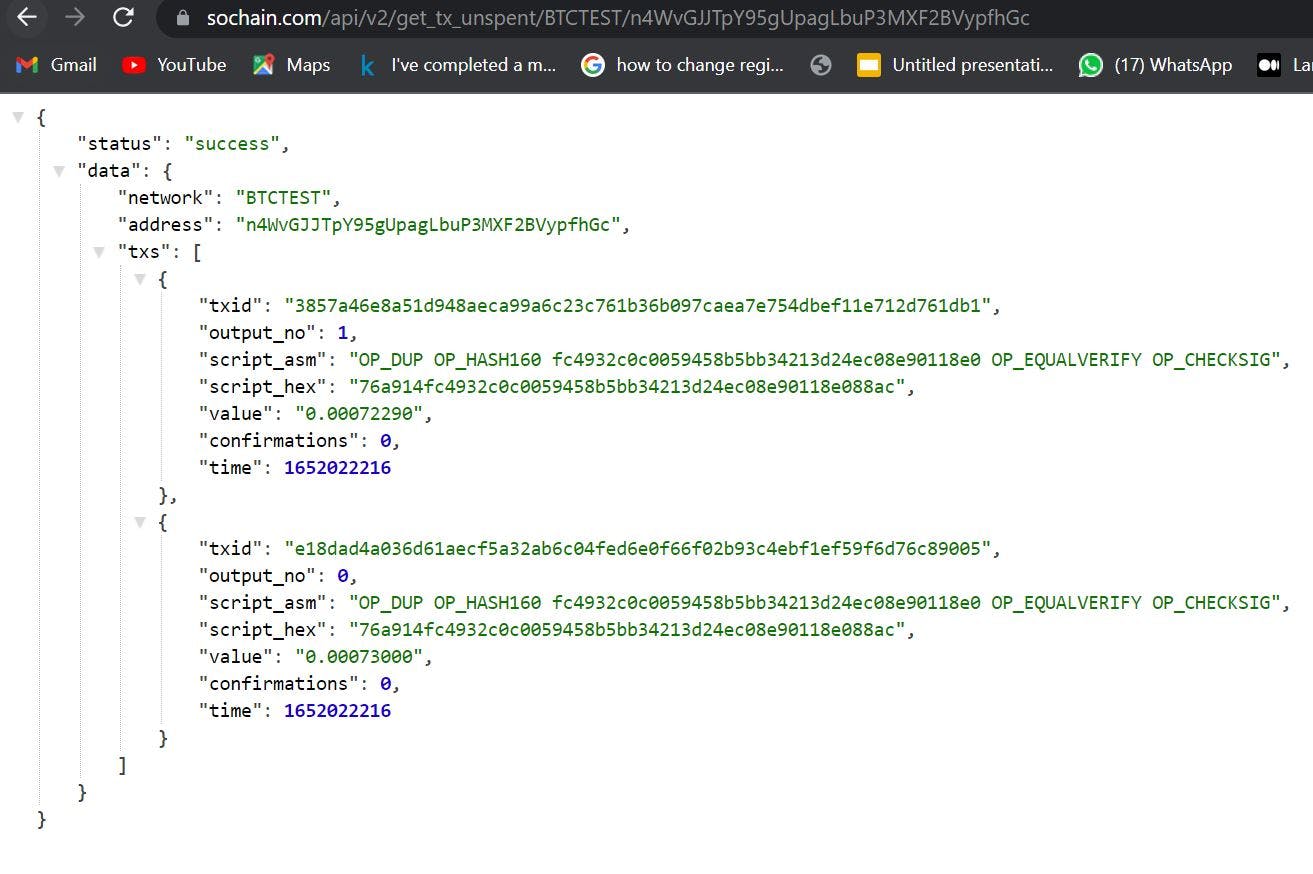
But then for our program to be able to read our wallet UTXO, we would make use of Axios, so if you don't have Axios installed in your application, do well do install it.
So we use Axios to access our wallet account details from Sochain. The 'txs' part is an array of all the unspent transaction outputs. For the snapshot above, there are only two because I sent Bitcoin to that address twice, and it has not been spent.
So I looped through the 'txs' array using the inbuilt Javascript foreach loop. For every loop, we get the Bitcoin value and convert it to satoshi; we also get the output number (output of each index in a transaction), the transaction id (unique identifier to identify a particular transaction in the blockchain), the wallet address and the script (script_hex). The script is just an instruction used to define how to spend our UTXO. We save all of these values in an object, and once we are done, we then push all values into the input array that we initially defined. Now we have our transaction input. Onto the next step which we said is defining transaction fee. If you have played around with cryptocurrencies, this won't be a new term, also you would notice that sometimes this fee is high, and other times it is low, probably so low that it can be close to zero. Fees are defined by the spender/wallet. Even if you set your fee to zero, your transaction would go through, but it would take a long time before it is picked up by miners for validation and added to the blockchain. These fees are compensation paid to the miners for their efforts in keeping the network secure and validating transactions. So imagine I set my transition fee to a high value, you set yours to a low value, and a third person decides to send bitcoin without a transaction fee, my transaction would with a great percentage be processed fastest because I am paying the highest compensation, mine would then be followed by yours and then the body that sends without any transaction fee. But how can we determine this fee in that we are fair with the fee price we set for a particular transaction?
One thing to note is that transaction fee are not dependent on the amount of bitcoin that is being sent, instead, transaction fees are dependent on the size of the transaction. Interestingly, this size depends on the input and output in the transaction. There is a formula to calculate transaction size.
transactionSize = inputCount * 180 + outputCount * 34 + 10 - inputCount;
This is because, for every bitcoin transaction, the input contributes about 180 bytes to the transaction while the output contributes 34 bytes. For contingency sake, there is an extra 10 bytes we can add to the transaction as well. Using our transaction details, for example, we see that we have two inputs, and one output, we can then calculate our transaction size to be (2 * 180) + 34 + 10 - 2 = 432 bytes. So if we want to pay 20 satoshis per byte, our transaction fee would then be 8640 satoshis (0.0000864 bitcoin).
Now that we have set our transaction fee, our next step states that we need to check if we have enough balance to cover the transaction i.e Inputs - (amount to be sent + fee) >= 0. Once all the checks are complete, we initialize a new transaction function using the bitcore package.
    const transaction = new bitcore.Transaction()
    transaction.from(inputs)
    transaction.to(toAddress, Math.floor(amountSatoshi))
    transaction.change(fromAddress)
    transaction.fee(fee)
    transaction.sign(privateKey)
    const serializeTxn = transaction.serialize({ disableDustOutputs: true })
We set our 'from' to the input wallet balance that we want to spend BTC from; we set 'to' to the wallet address we are sending to, here we also indicate how much we intend on sending in satoshis; we set our change address i.e the address that is going to receive all of the remaining Bitcoin balance. In this case, we set our change address to ourselves; then we set the transaction fee to the value that we calculated for the transaction fee; lastly, we sign our transaction using the private key, to authenticate that the person sending the transaction actually owns the wallet which contains the Bitcoin inputs. Remember the private key is like a password to unlock funds in any bitcoin wallet. To broadcast the transaction to the network, we need to serialise the transaction to get the transaction hex, it is this transaction hex that we'll broadcast to the blockchain.
And finally, we broadcast out transaction hex using the Axios post request using SoChain node.
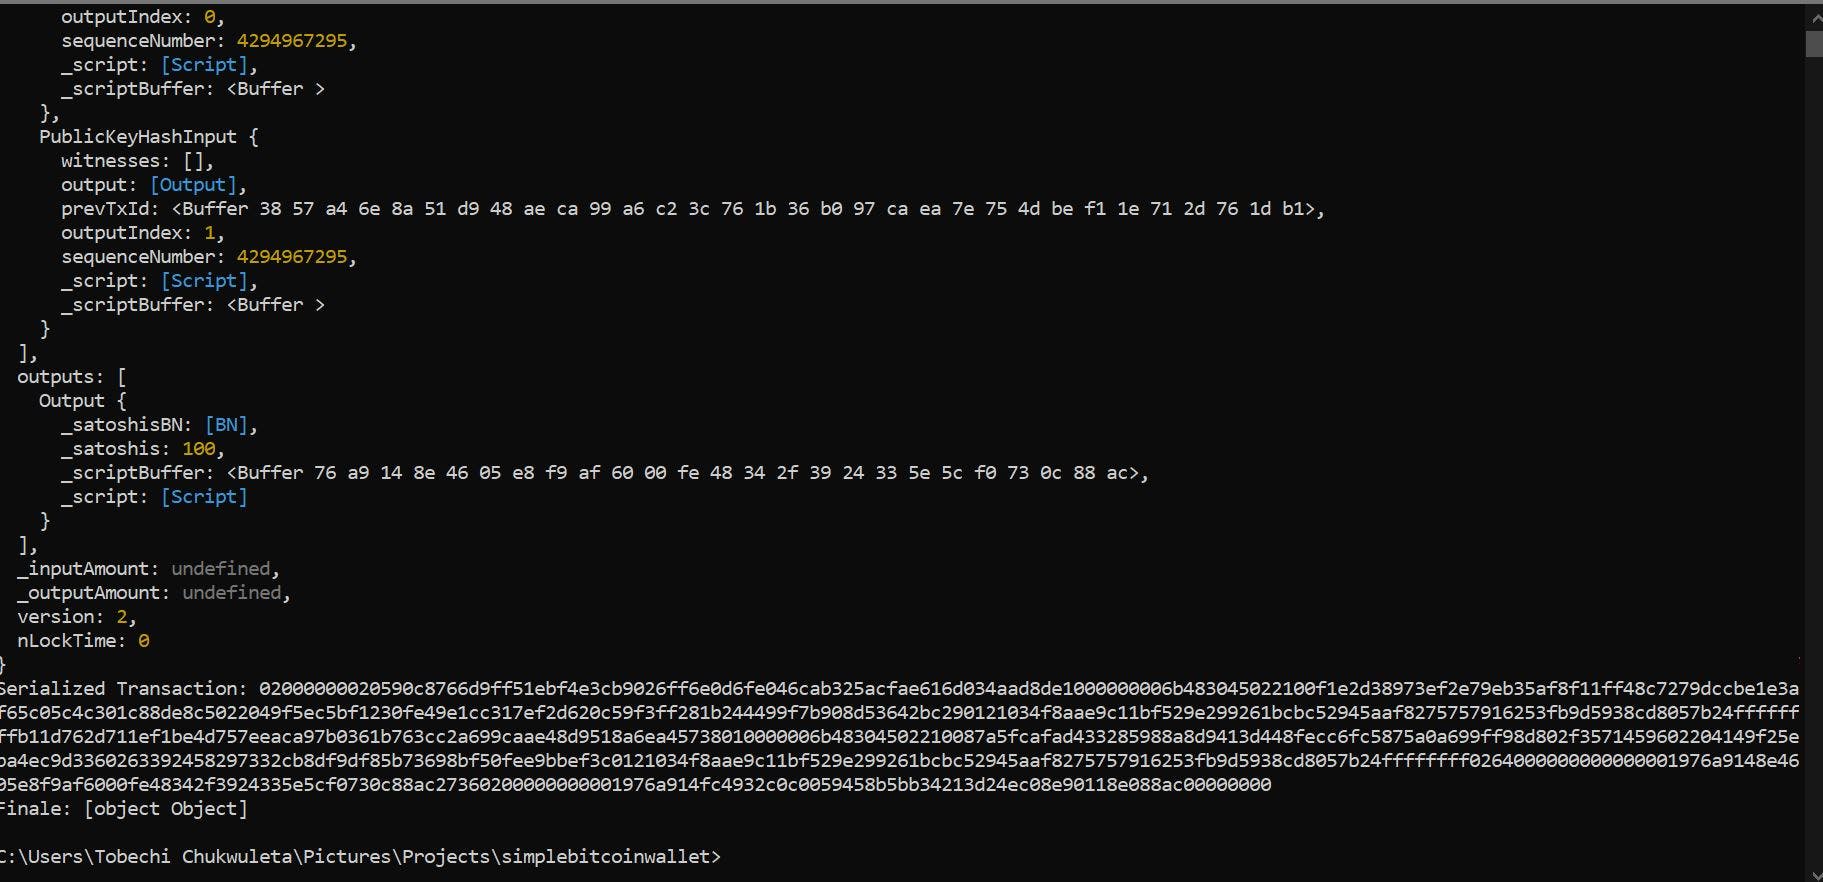
As you can see, we have our serialized transaction. Please ignore the other parts, it was just me doing some console.log.
Now if we go to our spend wallet address through SoChain, we would find out we have been successfully deleted.
Notice one thing; we have one transaction against the two that we initially had. Remember, I said when we perform a transaction in BTC, Bitcoin combines all of the available input and spends all of them. This one transaction we see here is the transaction output that the change wallet address received, and if you want to, you can confirm the addition and subtraction that was done.
Also, for our recipient wallet address, we see:
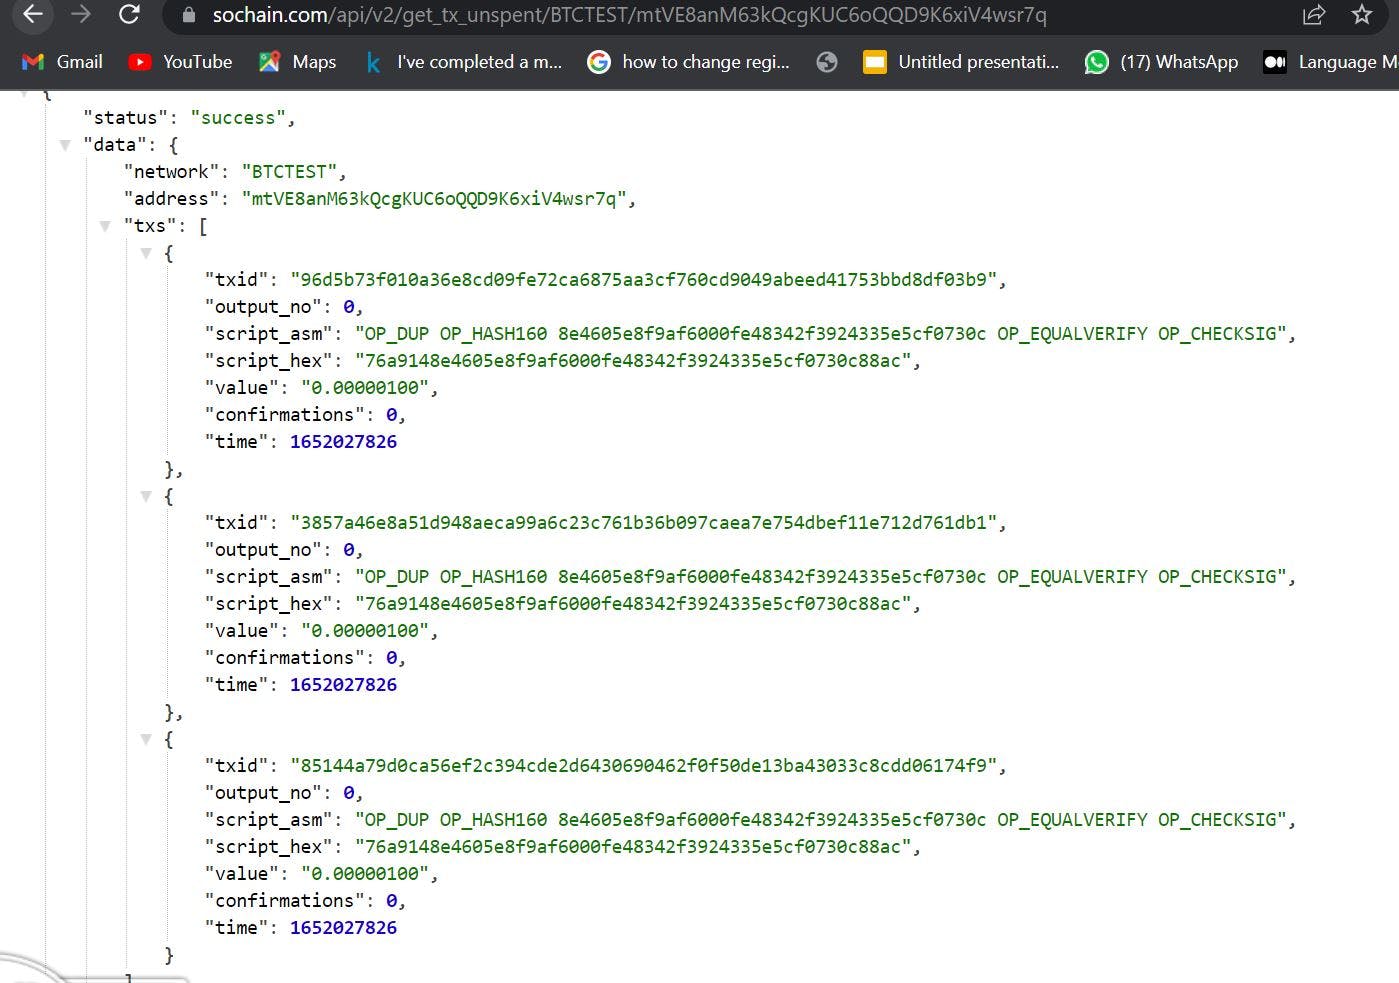
We see multiple here because I initially tried depositing money to the wallet address while learning about transactions in the Bitcoin network.

And we are done. You can start sending bitcoins to your friends and family... Hehe... But remember, to send real bitcoin, you need to change the network from testnet to bitcoin and from BTCTEST to BTC.
One thing is essential to point out, learning never stops, so go ahead build more, do more, and be more.
Congratulations on creating your bitcoin addresses that you can use to receive funds and perform your first bitcoin transactions. As I mentioned earlier, many algorithms and functions are used in creating wallet addresses.
So to my goodies. What if I told you that there is a platform that offers you the opportunity to learn Bitcoin, and the beautiful thing is that you still get paid while learning about Bitcoin. You didn't know, so let me tell you about Qala.
Qala is a program designed to train the next generation of African Bitcoin and Lightning developers. It is meant for people interested in becoming Bitcoin and Lightning developers. It goes beyond surface learning like this article and dives deep into security concerns, adversarial thinking, and approaches to Bitcoin and Lightning software design. Qala is a project-based learning program allowing its student to contribute to open-source projects or work on a personal project of their choosing. The good part of this is that you get paid certain stipends while learning. Isn't this amazing. Go now to qala.dev and register to be part of this fantastic program.
Yes, you can follow me on my socials: Twitter and LinekdIn Thank you so much for staying put... It's been a fantastic ride with you; until next time/article, Obrigado.
